How Do You Put a Meat Grinder Together?
To learn how to assemble a meat grinder, slide the auger into the head, fit the blade and grinding plate, then tighten the retaining ring. Attach the head to the motor and add the tray as your manual directs.
On this page (10 sections)
- How do you assemble a meat grinder in order?
- Which way should the blade face?
- How do you attach the head to the grinder?
- How can you tell if the blade and plate are fitted correctly?
- What changes when you use a sausage attachment?
- How do you choose a grinder that's easy to set up?
- What common assembly mistakes should you avoid?
- What should you do before switching the grinder on?
- What should you check after cleaning?
- How to assemble a meat grinder: which one should you choose?
To learn how to assemble a meat grinder, slide the auger into the head, fit the blade and grinding plate, and secure them with the retaining ring. Then lock the head onto the motor unit and attach the tray as your model's manual directs.
Keep the motor unplugged while you assemble the parts. If something won't seat with light pressure, stop and check its direction and order instead of forcing it.
How do you assemble a meat grinder in order?
Fit the auger, blade, plate, and retaining ring in that order on a typical electric grinder. Then secure the head to the motor and attach the tray and other parts.
- Unplug the grinder and set the motor unit on a stable, dry surface.
- Slide the auger into the grinding head, with its shaft end toward the motor.
- Fit the blade onto the square end of the auger.
- Place the grinding plate against the blade, aligning its notch with the head.
- Screw on the retaining ring until it is secure, without overtightening.
- Lock the head onto the motor unit as the manual shows.
- Attach the tray and keep the pusher nearby.
Some grinders use a separate locking knob, collar, or turn-lock. Follow the model's manual if its diagram shows a different arrangement.
Which way should the blade face?
On many grinders, the blade's flat cutting edges face outward toward the plate. The blade should sit squarely on the auger's end, with the plate resting against it.
Blade shapes can differ, so check the diagram for your grinder. The blade should lie flat rather than wobble or sit at an angle.
If the ring won't turn easily, stop and check the order and alignment. A misaligned assembly can damage parts or make them hard to remove.
How do you attach the head to the grinder?
Align the head with the motor housing and lock it using the grinder's own fitting. Some designs insert into a socket and secure with a side screw; others use a turn-lock.
Keep the motor unplugged while fitting the head. If it doesn't sit flush or lock with light pressure, remove it and check the tabs and manual.
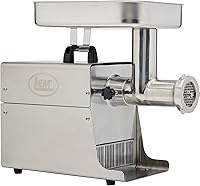
The LEM #8 has an aluminum head that locks with a quarter turn and disassembles for cleaning. That setup suits occasional home grinding and cooks who value a straightforward assembly routine.
After the head is secure, fit the tray and any model-specific accessories. Keep the pusher beside the tray so you don't reach into the feed opening while the grinder runs.
How can you tell if the blade and plate are fitted correctly?
The plate should sit flat against the blade, with its notch aligned to the head. The retaining ring should hold the parts firmly without excessive force.
With the grinder unplugged, inspect the assembled head by hand. It should not rattle, tilt, or show an obvious gap between the blade and plate.
If the assembly looks uneven, remove the ring and check each part. Don't try to adjust the blade or plate while the head is attached to the motor.
For routine upkeep, read how to sharpen meat grinder blades and plates. A sharp blade still needs to sit flat against the plate to cut properly.
What changes when you use a sausage attachment?
A sausage setup may use a stuffing plate and tube instead of the ordinary grinding plate. The right combination depends on the grinder and its attachment.
The STX Turboforce 3000 includes a stuffing plate and three sizes of stuffing tubes. It's a fit for home cooks who want grinding and sausage attachments in one set; skip it if you need a commercial grinder, because it's intended for household use.
Follow the manual to see which parts replace the grinding plate and how the tube attaches. Don't assume the grinder is ready to stuff just because the tube is on.
For a different assembly style, the AAOBOSI has a screen with preset modes and auto-reverse. Its maker says to avoid continuous use beyond 10 minutes, so it suits cooks who want touch controls and accessories but may not suit long, uninterrupted batches.
If you're choosing a grinder first, what size meat grinder do you need can help match capacity to your batch size. For sausage specifically, see how to grind pork for sausage at home.
How do you choose a grinder that's easy to set up?
Choose by batch size, assembly style, and the attachments you'll actually use. A larger hopper or more accessories won't help if your usual batches are small or you don't have room to store them.
The LEM #8 is a compact home option for occasional grinding. It processes 2–3 lb per minute and includes a stuffing tube and plate, but its smaller size is less suited to people who regularly process large batches.
The STX is a better fit if you want a larger hopper and several grinding and sausage attachments for home use. It is not for commercial work, and the manufacturer says not to use it for bones, tendons, vegetables, plants, nuts, or fruit.
The AAOBOSI suits cooks who prefer touch controls, preset modes, built-in accessory storage, and auto-reverse. Its 10-minute continuous-use limit is a reason to choose another machine if your routine needs longer runs.
Before buying, check what the machine includes and how its head locks. A quarter-turn lock, separate screw, or other fitting changes the assembly steps, so the manual should be easy to find and follow.
What common assembly mistakes should you avoid?
The most common setup problems come from reversing the blade, misaligning the plate, or forcing the retaining ring. Unplug the grinder before correcting any of them.
Start again from the auger if the parts don't sit flush. Check that the blade fits the auger's square end, the plate notch aligns with the head, and the ring catches its threads evenly.
Don't use the pusher as a substitute for correct assembly, and don't reach into the feed opening while the motor is running. Use the grinder's pusher and follow the manual's feeding directions.
If the motor slows or the grinder clogs, turn it off before checking the cause. Why a meat grinder keeps clogging covers common causes and next steps.
What should you do before switching the grinder on?
Confirm the head is locked and the ring is secure before plugging in the grinder. Keep hands and utensils out of the feed opening while the motor runs.
Read the manual for the model's safety instructions, permitted ingredients, run-time limits, and attachment directions. Those details vary by machine.
Prepare meat as directed and place it in the tray only after assembly. Feed it with the pusher rather than your fingers.
What should you check after cleaning?
Dry the parts and inspect them before reassembly. Look for a damaged blade, chipped plate, worn threads, or anything that stops the ring tightening evenly.
LEM says its parts clean with warm, soapy water. Follow your grinder's care instructions, and keep the motor unit away from water.
If you grind burgers after reassembling, how to grind your own hamburger meat explains preparation and grinding. If the grinder still won't fit together, consult its manual or contact the manufacturer before operating it.
How to assemble a meat grinder: which one should you choose?
Choose the LEM #8 for occasional home batches and a simple quarter-turn head lock. Pick the STX if you want a larger home setup with sausage attachments, or the AAOBOSI if touch presets and auto-reverse match your routine.
Before grinding, assemble the auger, blade, and plate in the order your manual shows, then check that the head and ring are secure. Keep blade and plate sharpening guidance nearby for upkeep.
Frequently asked questions
Which way does the meat grinder blade face?
On many auger-style grinders, the blade's flat cutting edges face outward toward the grinding plate. Check your model's manual, because blade shapes and assembly details can differ.
The blade should sit squarely on the auger's end, with the plate resting flat against it.
If the parts wobble or don't fit snugly, stop and check their order.
Should a meat grinder plate go before or after the blade?
On a common auger-style grinder, fit the blade onto the auger's square end first, then place the plate against the blade and secure both with the retaining ring. The blade and plate need to meet evenly for grinding.
Follow your model's manual if its parts or order differ.
Do meat grinder parts need to be dry before assembly?
Dry parts fully after cleaning unless your manual says otherwise. Dry parts are easier to handle, and drying helps prevent storage problems for parts that can rust.
Assemble on a stable, dry surface with the motor unplugged.
Handle the cutting edges carefully.
Why won't the grinder head lock into place?
The head may be misaligned with the motor housing, or the locking screw may need to be loosened before installation. Unplug the grinder, remove the head, and check its tabs and the manual's fitting steps.
Don't force the head or run the motor until it locks securely.