How to Clean a Deli Slicer
To clean a deli slicer, unplug it first, set the thickness dial to its closed position, and take off the removable parts. Wash those parts by hand with hot soapy water, wipe the blade, guard and body without soaking them, and dry everything fully before reassembly.
On this page (9 sections)
- What should you do before you start cleaning a deli slicer?
- Which parts come off, and which stay on the machine?
- How do you wash the removable deli slicer parts?
- How do you clean the blade without cutting yourself?
- How do you clean the slicer body, guard and hard-to-reach spots?
- How do you dry and reassemble a deli slicer?
- How often should you clean a deli slicer, and when should you deep clean?
- What mistakes make deli slicer cleaning harder?
- Which deli slicer is easiest to keep clean?
To clean a deli slicer, unplug it first, set the thickness dial to its closed position, and take off the removable parts. Wash those parts by hand with hot soapy water, wipe the blade, guard and body without soaking them, and dry everything fully before reassembly.
Cleaning a deli slicer well comes down to order. Handle the sharp blade while it's still guarded and still mounted, deal with the parts that touch food, then finish the body and put everything back before the next session.
What should you do before you start cleaning a deli slicer?
Unplug the slicer and lock the blade down before you touch anything. That one step removes the main hazard, because a plugged-in slicer can start with a bump of the switch.
Turn the thickness knob fully to the closed position so the blade sits behind its guard. Slide the food carriage to the right and lock it if your model has a lock.
Clear the counter around the machine so you have room to set parts down.
Have your supplies ready: hot soapy water, a soft sponge or cloth, a small brush for crevices, paper towels and a drying towel. Avoid abrasive pads and chlorine bleach on the blade and aluminum body.
Keep the blade guard in place the whole time you clean around the blade. A 10-inch blade is a cutting edge, so treat it as one, not a surface to scrub.
Which parts come off, and which stay on the machine?
The removable food carriage, product table, food pusher and blade guard cover come off; the motor housing and the mounted blade do not. Removable parts are where food residue collects, so they get a full wash.
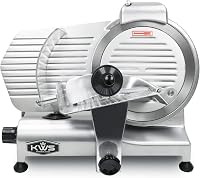
On the BESWOOD 10-Inch Deli Slicer, the removable product table lifts off for easier cleaning. The CUSIMAX 8.7-Inch Meat Slicer goes further, with the blade, food pusher and food carriage all readily removable.
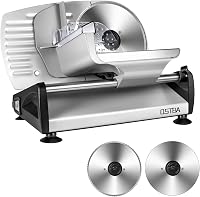
The OSTBA 7.5-Inch 200W Meat Slicer detaches its blade, food carriage, slide-rod extension, food pusher and ring-guard cover.
If your model has a removable blade, follow its own instructions for taking it off. If the blade stays mounted, leave it in place and wipe around it.
How do you wash the removable deli slicer parts?
Wash removable parts by hand in hot soapy water, rinse them well, and dry them straight away. Hand washing protects edges and non-stick surfaces better than a dishwasher cycle.
Use a soft sponge or a small brush on the carriage rails, the thickness plate and the pusher. Food gets pressed into the small gaps around the slide rod, so run the brush along those seams rather than wiping over them.
Some slicers allow dishwasher cleaning for certain parts. The CUSIMAX and OSTBA both list dishwasher-safe care, but check what the maker allows for each piece before you load it.
A blade that bangs against other dishes can lose its edge or chip.
Rinse with clear warm water and dry every part with a towel. Air drying leaves water spots and moisture in the tight corners.
Which slicers are easiest to break down for cleaning?
The {{product B01AQH636Q | A 10-inch blade and a removable product table that lift the cleanup burden after big slicing jobs.}} suits households that slice in batches. The chromium-plated steel blade resists corrosion, so it needs less frequent sharpening.
{{product B0C4YKDMDM | The blade, food pusher and food carriage all lift out, which gets the messy parts into the sink fast.}} It's a practical choice if you clean after every session and want fewer blind corners to reach.
{{product B0H6WVYT54 | A fully detachable blade, carriage, slide-rod extension, pusher and ring-guard cover make the hidden seams reachable.}} That set of removable pieces covers most of the spots where food hides.
How do you clean the blade without cutting yourself?
Wipe the exposed blade face with a soapy cloth while the guard stays in place. Work from the center outward and keep your fingers flat behind the cloth.
Never hold the blade edge-on, never run a finger along it, and never scrub across the teeth of a serrated blade. For a serrated edge, use a brush with stiff bristles along the groove of each tooth.
If the blade is removable and your model allows it, take it off as instructed and wash it separately in hot soapy water. Dry it fully and lay it flat on a towel, never edge-down in a drying rack.
A mounted blade still needs attention at the guard opening. Fold a soapy cloth and slide it into the gap to wipe the exposed rim.
How do you clean the slicer body, guard and hard-to-reach spots?
Wipe the motor housing and the fixed guard with a cloth wrung out in soapy water, then dry them. Never spray water or cleaner directly at the machine, and never dunk the body.
The thickness slide, the hinge points and the area under the carriage collect crumbs and dried meat fibers. Use a small brush or a cotton swab dipped in soapy water to lift them out, then wipe with a clean damp cloth.
Pay attention to the seam where the blade guard meets the body. That's the spot most people miss, and it's where residue turns sticky and smells.
A folded cloth pressed into the seam works better than a flat wipe.
Wipe the outside of the motor housing last, then go over the whole machine with a dry cloth. Leave no wet patches near the switch or the cord inlet.
How do you dry and reassemble a deli slicer?
Dry every part completely, then put the machine back together in the reverse order you took it apart. Moisture left in seams or under the carriage is what causes rust and odors.
Set parts on a clean towel and turn them so water runs out of the hollows. Give the blade extra time, especially around the hub.
Reassemble once everything feels dry to the touch.
Refit the product table, carriage and guard cover and check that each sits flush. Turn the thickness knob through its full range to confirm it moves freely.
Leave the slicer unplugged until the next use.
Wipe the blade once more with a dry cloth before you store the machine. A thin film of food-safe mineral oil on carbon steel parts helps prevent rust if your model calls for it.
How often should you clean a deli slicer, and when should you deep clean?
Clean the food-contact parts after every slicing session and deep clean the hidden areas weekly. Small jobs still leave a film of fat and juice behind the guard.
Wipe the blade and carriage right after you finish slicing, while residue is still soft. Then do the full strip-down wash when you have time, ideally the same day.
Cheese and cured meat leave the stickiest film, so handle those sessions first.
Once a week, or after heavy use, take off every removable piece and brush the seams and slide rods. That's also the moment to check the blade for nicks and to sharpen if slices start tearing.
Once the machine is clean and back together, a few habits keep it that way. Store it with the blade guard in place and the carriage locked.
Learn the right cutting motions in our guide to how to use a deli slicer so less food ends up pressed into the works in the first place.
What mistakes make deli slicer cleaning harder?
Soaking the body, scrubbing the blade with abrasives, and skipping the guard seam are the three mistakes that cost the most. Each one either damages the machine or leaves food behind.
Never submerge the motor housing or spray it with water. Water near the switch or cord inlet is a shock risk.
Wipe with a damp cloth only.
Skip steel wool and harsh pads on the blade and aluminum body. They scratch the chromium plating and give moisture a place to start corrosion.
A soft cloth and mild dish soap do the job.
Don't reassemble while parts are damp, and don't run the slicer to "blow dry" the blade. Both spread moisture into the seams.
Don't forget the underside of the carriage and the slide rod. Those are the surfaces the next slice of meat rests on.
Which deli slicer is easiest to keep clean?
A slicer with removable food-contact parts is the easiest to keep clean, and the highest-scoring pick here is the BESWOOD 10-Inch Deli Slicer. Its removable product table and top-mounted sharpener cover both cleaning and blade upkeep.
If cleaning after every session matters most to you, the CUSIMAX 8.7-Inch Meat Slicer and the OSTBA 7.5-Inch 200W Meat Slicer both detach the blade and carriage. Compare the three in our roundup of the best deli slicer for home, and check the CUSIMAX meat slicer review for a closer look at that model.
On a tighter budget, the meat slicer for the money guide covers what you give up as the price drops. Whichever machine you choose, cleaning a deli slicer the right way comes down to the same order: unplug, strip the removable parts, wash and dry them fully, then wipe the body and blade guard before reassembly.
Frequently asked questions
Can you put deli slicer parts in the dishwasher?
Only if the maker allows it for that specific part. The CUSIMAX and OSTBA slicers list dishwasher-safe care, but hand washing removable blades and carriages with hot soapy water is the safer default and protects the edges.
How do you clean a deli slicer blade safely?
Unplug the slicer first and keep the blade guard in place while you wipe the exposed face with a soapy cloth. Never hold the blade edge-on or run a finger along it.
If your model has a removable blade, follow its instructions for taking it off, then wash and dry it fully.
Do you need to sharpen a deli slicer after cleaning?
Not every time. Sharpen when slices start tearing instead of cutting cleanly.
The BESWOOD slicer has a top-mounted, two-stone sharpener built in, so you can touch up the edge without removing the blade.
What should you never use to clean a deli slicer?
Skip abrasive pads, steel wool and harsh chlorine bleach on the blade and aluminum body. They scratch the surface and can speed up corrosion.
Use a mild dish soap, warm water and a soft cloth or sponge instead.